Thank you for your consideration

My projects are not to be submitted and/or used in any written publication, advertisement or contest without my knowledge. I am flattered if you use one of my projects as inspiration, but please give me credit when you do and, if possible a link back to this blog. If you have any questions or concerns, please reach out to me using the contact form. Thank you

PRIVACY NOTICE

To comply with EU ePrivacy Regulation: Those leaving a comment on any post on this blog do so in the knowledge that their name and blog link are visible to all who visit this blog. If you should leave a comment on this blog you understand that you are sharing your blog name and blog address that will be visible for all to see. By providing your comment you are also giving consent for this information to be posted.

I appreciate my Followers!

Tuesday, March 31, 2020

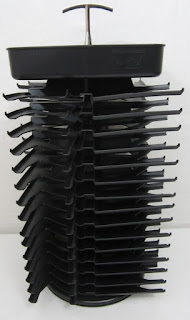
Repurposing a Stampin Up! Ink pad tower

Who still have these becuase they just can't stand the thought of getting rid of them yet?!

picture from pinterest

In the early days of my stamping, I loved my Stampin Up! Ink Pad holder. All my pads right there on my work table right in front of me! They are a bit expensive but I saved my pennies to purchase it. But like most of us, over time my ink pad collections grew while the tower did not.

At one point it held the odd distress and Staz-on ink pads, but eventually I outgrew the tower, again. So, it sat in the corner of my spare bedroom collecting lots - and lots - and lots of dust! Lord this thing is a dust magnet! LOL

Anyway, since my family is now practicing social distancing during the current Covid-19 Pandemic I have been cleaning up and out my craft room and supplies. I thought about donating but decided to give it another shot at usefulness by creating some small drawers and turning it into rotating storage for my embellishments which I have also been going through.


Here's what you are going to need if you want to try this yourself. I also created a sheet showing the score lines and cut lines which will be at the end of the post. Please note that all measurements are in inches.

  • 12 sheets of 8.5 x 11 card stock
  • Optional - add 4 more sheets (16 total) to make boxes for the top of the tower
  • Bone Folder
  • Labels (Optional)
  • Paper Trimmer
  • Punch for a Tab (I used a tab punch from Stampin Up! cut in half)
  • Scissors
  • Score board
  • Strong glue or adhesive tape (I used Art Glitter Glue)


To make the drawers, score 12 of the card stock sheets as follows

Score on the short side at
.75"
3.50"
5"
7.75"

Turn

Score on the long side at
.75"
4.75"
6.25"
10.25"

Using the paper trimmer, cut the card stock into four 4.25 x 5.50 (4-1/2” x 5-1/2”) pieces (A2 size)

Using the scissors clip a small wedge from each corner to facilitate a clean closure


Using your bone folder, create nice crisp folds along the score lines


Next, start folding in and glueing the corners


Almost finished drawer


Adhere tabs on the bottom


Thats it! All done. Now you can add a label. I do suggest that if you are planning to hand write onto the drawers to do so before glueing into shape.

If you want to make the boxes for the tops you will need the extra 4 pieces of card stock.

Cut into 8.50" x 8.50" square

Score at 2.50" and 5.75"

Turn

Score at 2.50" and 5.75"

As with the drawers, trim a small wedge from each corner and use your bone folder to create nice crisp folds. Then start folding in and glueing.

Here is the layout for the drawers


Thanks for stopping by!
I hope you enjoyed this simple tutorial!
(Hugs) Cara


Tuesday, March 24, 2020

The Outlawz Challenges: Monochromatic

Thought for the Day
“When you replace ‘why is this happening to me’ with 
what is this trying to teach me’, everything shifts.”

Hi everyone! Today I am sharing my card for the new color challenge which started this past Tuesday at The Outlawz Challenges and sponsored this month by Paper Nest Dolls!


This bi-weekly challenge is monochromatic and will run through April 6th,

Here’s my card using a cute Sponsor image called “Road Trip”.


Supplies used
  • Image printed on Stampin Up! Whisper White card stock
  • Cardstock from The Paper Studio (base), Stampin Up! & Bazzill
  • Design Paper from Scrapbook Wizard
  • Embossing folder from Close to My Heart
  • ProMarkers
  • Rhinestones from Stash 

Thanks for stopping by and don’t forget to stop by The Outlawz Challenges for more challenges and Inspiration!
(Hugs) Cara

Sunday, March 15, 2020

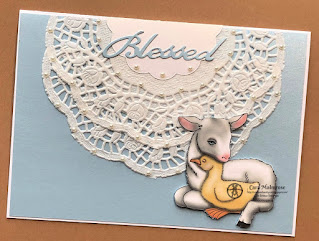
The Outlawz Crash your Stash Challenge: Doilies

"Easter," all her birds are singing, Easter, and the souls of men, lying long in strife and shadow, Take the light of heaven again. ~J.J. Britton (1832–1913), "Easter"

Good morning!
Today is the start of a  new “Crash your Stash” challenge at The Outlawz Challenges which will run until March March 28th.

Our Sponsor this month is Wink Wink Ink
Check out her Etsy store HERE

Our stash item for this month is Doilies
One of those odd items that seems to come and go in the crafting world. I think the ones I have were originally bought for a winter tea my daughter & I did last year and I had a several left. I couldn’t bring myself to toss them but I also don’t need more stuff piling up in a craft room I am trying to clean up.

For my card I cut one doily in half and did some creative layering. I love how the simple pattern looks so elegant. Perfect backdrop for the cute image from the Sponsor I am using called Farm Friends.


Supplies:
  • Pre-Colored Sponsor image printed on Stampin Up! Whisper White card stock
  • Card stock from The Paper Studio (base)
  • Doily from The Dollar Tree
  • Pearls from Recollections
  • Sentiment from Spellbinders
  • Shimmer paper from Neenah

Now come on over to The OutlawzChallenges to play along with us or one of the other challenges that are always in process!

(Hugs) Cara


Friday, March 13, 2020

Babycakesdnd: March Release 1

If you hold a four-leaf shamrock in your left hand at dawn on St. Patrick's Day you get what you want very much but haven't wished for. ~Patricia Lynch

Good morning!
Today Sandra has added 7 new images to her  ETSY SHOP and I am here to share one of them with you!

#3111 - Invisible Patrick


I love the sentiment I found on line. I thought it was perfect and a fun choice to go with Invisible Patrick!

Supplies
  • Image printed on Stampin Up Whisper White Card Stock
  • Card Candy from Stash
  • Card stock from The Paper Studio (base) and Stampin Up!
  • DE from Reminisce
  • Die from Spellbinders
  • Embossing folder from Printable Heaven
  • Liquid glass from Close to My Heart
  • ProMarkers
  • Sentiment found on line and printed out
  • White Gel pen 
Don’t forget to visit her Facebook page where there is always something happening!

Thanks for stopping by!
(Hugs) Cara 


Wednesday, March 11, 2020

The Outlawz Challenges: 3 colors and a twist

Thought for the Day
“If you look at what you have in life, you’ll always have more.
If you look at what you don’t have in life, you’ll never have enough.”
~ Oprah Winfrey

Hi everyone! Today I am sharing my card for the new color challenge which started this past Tuesday at The Outlawz Challenges and sponsored this month by Paper Nest Dolls!


Yes, I am a couple days behind scheduled because I got my days messed up and thought today was Tuesday!!!!!

This challenge we are using three colors and a Twist of either Easter or Spring and will run through March 23rd.

Here’s my card using a cute Sponsor image called “Will work for Carrots”.

Supplies used
  • Image printed on Stampin Up! Whisper White card stock
  • Cardstock from The Paper Studio (Base) & Stampin Up!
  • Liquid Glass from Close to My Heart
  • ProMarkers
  • White gel pen 
Thanks for stopping by and don’t forget to stop by The Outlawz Challenges for more challenges and Inspiration!
(Hugs) Cara

Sunday, March 1, 2020

SheepSki Designs: Use die cuts or punches

Friends are like sprinkles on the cupcake of life. ~Author unknown

Good morning!
Today starts a new monthly challenge on the SheepSki Designs Challenge Blog and this month our challenge is to use die cut or punches.

For my card I am using Coffee & Cake - image no 173 which can be found HERE in the ETSY shop

Using digital paper, I printed the flowers out, fussy cut and added to the cupcake which was also paper pieced using digital paper. I then used more dimensional foam to attached the cupcake to the card base.


Supplies
  • Image Coffee & Cake - image no 173 printed on Stampin Up Whisper White Card stock
  • Background die from CriCut
  • Cardstock from The Paper Studio (base and Stampin Up!
  • Digital paper from Touched by a Butterfly
  • Nuvo Crystal drops
  • Smile die from My Favorite Things 

Now ... You have two ways to play along with SheepSki Designs!

BLOG ... Where you can use any hand colored image for a chance to win 3 images ... BUT, if you use a SheepSki Designs image and are the winner, you get an additional image choice

or

FACEBOOK ... Where you must use a SheepSki Designs Image for a chance to win 3 images

As a bonus, when you are done shopping in the STORE, use this code “skiandrea10” at checkout to receive a 10% discount off your purchase! So, come along and play one or both! Can't wait to see what you create!
(Hugs) Cara